Assembly of inner mold inserts
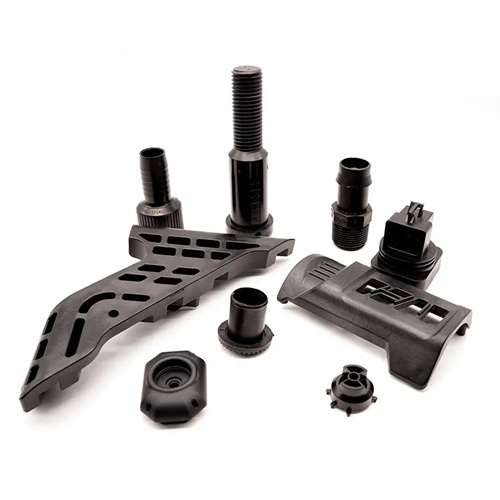
Inner mold inserts are removable parts used in injection molds to mold complex structures or vulnerable areas of products. Their assembly quality directly impacts mold precision, lifespan, and product quality. The assembly of inner mold inserts must meet requirements such as precise positioning, secure connections, reasonable clearances, and easy replacement. Scientific assembly processes and testing methods ensure that the inserts, along with the mold plate and other inserts, meet design standards, avoiding flashing, misalignment, and mold damage caused by improper assembly.
Positioning of inner mold inserts is crucial for assembly. Common positioning methods include step positioning, pin positioning, and tapered surface positioning. Step positioning utilizes a step at the bottom of the insert that mates with a countersunk hole in the mold plate. It offers positioning accuracy of 0.01–0.02mm and is suitable for small and medium-sized inserts. The step height is typically 3–5mm, with a clearance of 0.005–0.01mm. For example, the character inserts in a mobile phone keypad mold utilize step positioning. The step has a diameter of 20mm and a height of 3mm, with a clearance of 0.008mm against the mold plate countersunk hole, ensuring a positioning deviation of less than 0.02mm within the molded characters. Pin positioning is suitable for large or multi-piece inserts. It utilizes two to four locating pins with a diameter of 6–10mm to achieve precise positioning. The fit between the pin hole and the pin is H7/m6, and the pin length is 1.5–2 times the insert thickness. For example, the side-pulling core inserts in automobile bumper molds utilize four 8mm diameter locating pins, achieving a positioning accuracy of 0.015mm.
The fixing method for inner mold inserts should be selected based on the load conditions, including bolt fixing, clamp fixing, and interference fit fixing. Bolt fixing is the most common method and is suitable for inserts subjected to axial forces. The bolt specifications are determined by the insert size, with M6 to M12 being the most common. The tightening torque must meet the standard (for example, the torque for M8 bolts is 25 to 30 N · m ), and spring washers should be installed between the bolts and the insert to prevent loosening. For example, a cavity insert is fixed with four M10 bolts , which are tested with a torque wrench to ensure uniform force. Clamp fixing is suitable for inserts subjected to lateral forces, such as core-pulling inserts. The mating surface between the clamp and the insert must be ground to a flatness of ≤ 0.01mm . The clamp is pressed against the side of the insert with bolts to prevent displacement under injection pressure. Interference fit fixation is suitable for small inserts, with an interference amount generally of 0.01~0.02mm. It is assembled by shrinking the insert or expanding the template. It is suitable for inserts that form small holes or bosses. For example, a core insert with a diameter of 5mm uses interference fit, and the radial runout after assembly is ≤0.005mm.
The clearance control of inner mold inserts needs to be differentiated according to their functions. The clearance of the molding surface should be ≤ 0.01mm to prevent the melt from overflowing and generating flash. For example, the clearance between the cavity insert and the template is 0.005~0.01mm, which is guaranteed by precision grinding. The clearance of non-molding surfaces can be appropriately relaxed to 0.02~0.05mm to facilitate assembly and exhaust. For example, the clearance between the bottom of the insert and the template is 0.03mm, which serves as an exhaust channel. For modular inserts, the splicing clearance between each insert must be ≤ 0.01mm to avoid misalignment or overflow. For example, the ring gear insert of a gear mold is composed of three sections, and the splicing clearance is controlled within 0.008mm. The blue oil test ensures that the fitting area is ≥ 90%.
The assembly process for inner mold inserts includes five steps: pretreatment, preinstallation, adjustment, fixation, and inspection. During the pretreatment phase, the mating surfaces of the insert and the mold plate are cleaned to remove burrs and oil stains. The mating surfaces are then polished with sandpaper (800#-1200# grit) to reduce the roughness to below Ra0.8μm. During preinstallation, the insert is gently placed into its position and inspected for any binding or misalignment. Adjustments are made by gently tapping with a copper rod if necessary. During the adjustment phase, the insert’s positioning accuracy, such as flatness, perpendicularity, and coaxiality, is checked using a dial indicator or a three-dimensional coordinate measuring machine to ensure it meets design requirements (generally ≤0.01mm). During fixation, bolts are tightened diagonally to avoid uneven force that could cause deformation of the insert. Position accuracy is repeatedly measured during the tightening process until it meets the requirements after fixation. During the inspection phase, red lead powder flaw detection is used to verify the fit between the insert and the mold plate. Acceptance is determined when the red lead powder is evenly distributed and there are no gaps.
The assembly quality of inner mold inserts must be verified through mold trials. During these trials, the part is inspected for defects such as flash, misalignment, and missing material to determine if the insert assembly is qualified. For example, if flash is found on a part after a mold trial, this could indicate excessive clearance between the insert and the mold plate. The insert step should be reground to reduce the clearance to less than 0.005mm. Positional deviation may indicate loose or worn locating pins, requiring replacement and repositioning. For easily damaged inserts, a quick-change mechanism should be designed, such as using eccentric pins for fastening. This reduces replacement time from the traditional two hours to 30 minutes, improving mold maintenance efficiency. Regularly inspect inserts for wear and looseness, and retighten bolts every 10,000 molds to ensure long-term stability.